Wednesday, 30 November 2011

White Balance.

I have never actually paid much attention to the white balance setting on my camera before, and as I now have the new camera I decided that now is probably the time to research more about it and make full use of the setting.

White balance (WB) is the practice of removing unrealistic colour casts, so that items that look white in person are shown as white in your photograph. White balance must take into consideration the "colour temperature" of the source of the light. This refers to the comparative warmth or coolness of white light. Our eyes are good ar judging what is white under different sources of light, but digital cameras often have difficulty with auto white balance (AWB) and this can create blue, orange or green colour casts. It is based on the ratio of the amount of blue light to the amount of red light, and the green is ignored. The unit for measuring this ratio is in degree Kelvin (K). A light with higher colour temperature has "more" blue light than a light with lower colour temperature. Therefore, a cooler light has a higher colour temperature. The following table shows the colour temperature of some light sources.
Option

Colour temperature in K.
Auto (camera sets WB automatically)
3,500-8,000
Incandescent
3,000
Fluorescent – Sodium vapour lamps
2,700
-Warm white fluorescent
3,000
-White fluorescent
3,700
-Cool white fluorescent
4,200
-Day white fluorescent
5,000
-Daylight fluorescent
6,500
-High temp. Mercury vapour
7,200


Direct sunlight
5,200
Flash
5,400
Cloudy
6,000
Shade
8,000
All values are approximate.

We see white paper as white paper regardless of whether it is viewed under strong sunlight or in a room lit with incandescent lights. Digital cameras usually have built in sensors to measure the current colour temperature and use algorithm to process the image so that the final result may be close to what we see. The algorithm that is being used may not be accurate enough to be correct every time. Under some difficult situations when the camera algorithm is not able to set the colour temperature correctly or when some creative effects are required, the camera can then be instructed to use a certain colour temperature to meet our needs. The adjustment which makes sure that the white colour we directly view will also look white in the image is referred to as white balance. Not setting the white balamce correctly may cause a colour shift in the image.

I am hoping now that as I have a better understanding of white balance, I will be less afraid of experimenting as I become more familiar with my cameras photographic settings.

Info from
wikipedia
Nikon d90 manual

Tuesday, 29 November 2011

Mulberry's 40th Anniversary.

I treated myself to the book Mulberry brought out to celebrate their 40th anniversary. I am addicted to all things Mulberry (bags, purses, scarves.......you name it) so I couldn’t resist.
Rather than talk about the company in great detail from when it began in 1971 it is instead “a glimpse inside our world, a fly-on-the-wall, warts and all journey through the past two years”.
Displaying nearly 500 pages of photographs, photographer Venetia Dearden had this exciting job to become a ‘Mulberry’ for two years, following their every move and documenting behind the scenes.
Having looked through the book have have tried to select just four (otherwise I could be here all day) very different photographs that have appealed to me in some way.


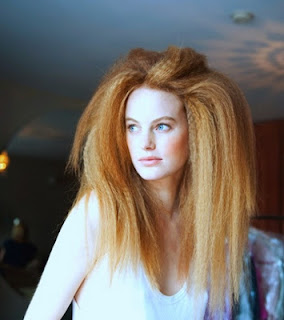
This first image is quite a typical "model" shot.......its all about the pale skin and the big hair.


Now this photo is the polar opposite of the first shot. There is no immaculate looking styled hair or clothes in this shot. It seems as though the photographer is trying to dispel the myth that models never eat.


Focusing solely on the brand here. I'm not sure what draws me to this image. Is it the black and gold? The feeling of irregular pattern? The picture is clearly supposed to be a random snap of the plates used to replicate the logo, but I have a feeling that they have all be carefully positioned.


This has got to be my favourite image in the whole book. It immediately struck me of the similarities between this photo and the pictures you see of drug addicts sat on the floor in dingy flats surrounded by paraphernalia. The girl in the photo is instead a true fashion addict!


I loved looking at this book and feel rather jealous that Venetia Dearden may have had what I believe is a dream job. This book appealed to me not just because of my love of this brand  but because I really enjoyed the social documentary of going behind the scenes of a company so well known. In my photos I have always shied away from photographing people. Maybe I feel that there is less control over the shot unless everything is neatly organised and positioned. Now I feel inspired to capture more natural shots and develop a new style........maybe I will be pleasantly surprised at what I achieve.


Mulberry "The Book" Mulberry Company (Design) Ltd 2011


Monday, 28 November 2011

Back to square one!

Well my new camera (Nikon D90) arrived a couple of days ago so I have been trying to get to grips with it. Obviously the majority of the settings are the same, it is just a case of how to alter each one. This camera does however have some settings that my previous camera did not have so I am in the process of researching some of these. I have read through the manual which has in some ways baffled me, but once I get used to navigating my way around the settings I hope that it soon becomes second nature. I guess that this is all part of the learning process.
I think that the best way to improve now will be to just get out and about and practice using it. I will of course have to take the manual with me to refer to. This weeks main task will be to do just this!


Sunday, 27 November 2011

Alexey Titarenko

Whilst internet shopping and looking on Topshops' blog ( I love fashion) they had mentioned Alexey Titarenko. I was intrigued by the images he creates and decided to take a closer look.
All of his photographs show every day familiar scenes from streets, road side vendors, commuters etc from places such as Venice and St Petersburg.  When taking a photo he plays with time using a long exposure so that the final image appears distorted and the figures become quite ghostly looking, with many of them taking on a cloudy quality.


I find something slightly sinister about this shot. Im not sure I like how the seller is so dark and seems to be hiding in the shadows.


I find this image very cloudy and ghostly but I particularly like the sense of movement and hustle and bustle you get from it.


This shot to me seems so quiet in comparison and appears as though it has a sadness about it. It looks so deserted and there is quite a lonely quality about it.


The figures in this shot appear less ghostly, the picture seems to emphasise how we spend our time rushing through life.

I really like how each photograph shows the surroundings so still and clear but the movement of the figures shows them blurry with no facial features distinguishable, this in turn highlights the anonymity of being in a city.
Alexey Titarenko received his Master of Fine Arts degree from the Department of Cinematic and Photographic Art at Leningrad's Institute of Culture in 1983. He had begun photographing at the beginning of the 1970s, and in 1978 became a member of the well-known Leningrad photographic club Zerkalo, where he had his first solo exhibition (1978).

Titarenko has received many awards from countless institutions. He has taken part in many international festivals, biennales, and projects and has had more than 30 personal exhibitions, in both Europe and the United States. His works are in the collections of many major European and American museums.
Some of his major photo series include "Nomenklatura of Signs" (1986-1991), "City of Shadows" (1992-1994), "Black and White Magic of St. Petersburg" (1995-1997), and "Time Standing Still" (1998-1999).

I feel inspired to try out the technique Titarenko uses to see if I can create my own ghostly images and I look forward to seeing what I can achieve.


Exposure.

As in the next project we are dealing with controlling the strength of a colour I decided to research exposure further. The course notes tell us that “under-exposure produces a ‘stronger’ colour, and in professional photography this is quite a common technique”.
Exposure is the amount of light that falls onto the sensor of the camera during the process of taking a photograph. In modern cameras the exposure is usually set to automatic by default. Getting a 'correct' exposure means recording as much of the relevant information in the scene as possible.
Even when the exposure is 'correct' the problem with all cameras is that they cannot record the entire range of contrast (black to white) that the eye can see. Especially when you take into account that the eye is constantly adjusting to cope with high contrast. On a sunny day if you look into the shadows of a scene then into the bright areas, the iris in your eye will quickly adjust so you can see detail in both.
An exposure generally refers to a single shutter cycle. For example: a long exposure refers to a single, lengthened shutter cycle to capture enough low-intensity light, whereas a multiple exposure involves a series of relatively brief shutter cycles; effectively layering a series of photographs in one image. When undertaking the task of recording as much information as possible, the camera then tries to average out all the light levels and expose in accordance with this.

Auto Exposure Modes

Automatic exposure (AE) mode automatically calculates and adjusts exposure settings to as closely as possible match the subject's mid-tone, to the mid-tone of the photograph.
Manual Exposure

Using manual exposure allows you to make choices regarding 'aperture priority', 'shutter priority', 'exposure compensation' etc.

The amount of light falling on the sensor is affected by.
  • The amount of light reflected from the scene. If you are photographing outdoors then there is little you can do about it.
  • The 'shutter speed' which is the amount of time the shutter is open which is measured in fractions of a second.
  • The 'aperture setting' which is the size of the hole through which the light enters (drawing comparisons with the iris of your eye) which is measured in 'f stops'.
  • The ISO setting which is the 'sensitivity' of the sensor. The higher the ISO setting the less light is needed to make an exposure.
The advantage of manual exposure is that the settings do not keep changing as your scene changes.

Exposure compensation.

This is used to alter exposure from the value suggested by the camera; this in turn makes the image darker of lighter. It is most effective when it is used with center-weighting or spot metering.


Wikipedia
Nikon D90 manual.
The Photographer's Eye - Michael Freeman - Ilex - 2007

Wednesday, 23 November 2011

Camera issues.

Since the last assignment I have been having a few problems. I started using the manual setting properly in preparation for this next set of projects but the screen was always appearing black as well as several other problems. I obviously thought that this was down to my lack of knowledge so set about researching in the cameras manual. After getting no where fast I contacted the manufacturer who believe there is a fault with the camera and suggested I pre-book the camera in with them to have it go in and be inspected by their technician. I did consider this but finally came to the conclusion that I have had the camera around 6 years now, so it is obviously not under warranty, and the cost of following their very specific instructions combined with the potential final cost of having any problems fixed, would probably end up being more than the camera is now worth.

I have there fore decided to treat myself to a new camera, a Nikon D90. I chose this camera as I know several people who own Nikons and they have said how good they find them, as well as doing a lot of internet research. Obviously my next step was to then decide on a model. Again I went on personal recommendations as well as a lot of research including many reviews written by photographers. A big factor in the decision unfortunately had to be the cost as however nice it would be to pick the best camera I can find, it is hardly a realistic option.The D90 had some excellent reviews and the cost was perfect for my price range. The specification seemed to match what I was looking for in a camera, although I have to say that quite a bit of the cameras description was so technical that I really struggled to understand it.I will of course keep my old camera as it seems that all the other settings work fine and I don't believe in waste.

The new camera should hopefully arrive within the next few days and I shall then be back to square one again in terms of learning how to use it. I feel the best way to get to grips with it, after reading through the manual, will be to get out and about and just start practising.

Sunday, 13 November 2011

Assignment 2: Feedback

I received the feedback for this assignment and there are several things I need to bear in mind for the next assignment. I must try to be more creative and put more of my own ideas, thoughts and experiences into the images I produce. I also need to try and "roll up some of the previous assignment work into subsequent assignments."

I really need to research white balance and focus/metering modes. I definitely must become more confident and able to make technical choices.

My tutor commented that my accompanying notes were useful and gave a good overview of my ideas but now I need to take this a step further and explain any technical choices I make.

Rather than just include references I should start to say how I have been influenced by these people/places/photographs.

My tutor mentioned I should try and give files more meaningful names, my files are all dated and then each photograph is numbered, but at the moment I find it easier to work like this. I understand that changing how I file further down the line is not ideal but at the moment I find it easier to locate my images this way.

I will try and concentrate on building a story around my photographs when preparing for the next assignment and apply more of my own interpretation. It was pointed out that with future assignments I may struggle technically as my camera will put me at a disadvantage. I need to try and make up for this creatively with images that are important to myself as well as cover all techniques I have learnt throughout the course so far.

I had hoped when handing in this assignment that I had progressed further than I have but need to accept that this is a learning process and try not to feel so disappointed and take comments to heart when I receive constructive criticism. I just need to carry on applying myself and gain more understanding of the technical elements so that I will feel I have really improved when it comes to the next assignment.